Lightboxes are amazing! We remember the first time seeing them in the jQuery days and thinking that someone really spent a lot of time building this, but over the years, things got easy and we’ve come to realize that it can be made in vanilla JavaScript and some CSS easily.
So, today we wanted to show you how you can build your own image Lightbox effect without using any plugins!
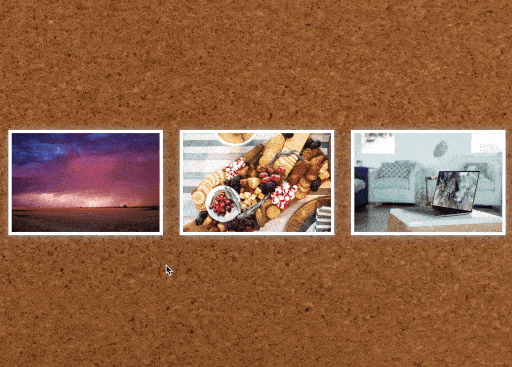
The end result is this:
HTML Structure
We will start by laying out the HTML building blocks of our application.
<div class="container"> <div class="col"> <img src="https://images.unsplash.com/photo-1605347220242-04d3b97ceee9?ixlib=rb-1.2.1&ixid=eyJhcHBfaWQiOjEyMDd9&auto=format&fit=crop&w=1950&q=80" onClick="openLightbox(this)" /> </div> <div class="col"> <img src="https://images.unsplash.com/photo-1605306030698-6e966cc142b4?ixlib=rb-1.2.1&ixid=eyJhcHBfaWQiOjEyMDd9&auto=format&fit=crop&w=1950&q=80" onClick="openLightbox(this)" /> </div> <div class="col"> <img src="https://images.unsplash.com/photo-1593642634402-b0eb5e2eebc9?ixlib=rb-1.2.1&auto=format&fit=crop&w=1950&q=80" onClick="openLightbox(this)" /> </div></div><!-- Actual Lightbox --><div id="lightbox" class="lightbox hidden"> <div onClick="closeLightbox()" class="close">❌</div> <div class="lightbox-content"> <img id="lightbox-image" /> </div></div>The top part contains the layout the user will see, in this case a container with three columns, each containing one image.
The image has an onClick function, which calls the openLightbox. (We will create this in a bit)
Then at the bottom, we have the actual Lightbox. Inside the Lightbox, we add a simple emoji powered close button, which onClick calls the closeLightbox function.
And inside the Lightbox we also see an empty image which we’ll use to place our image in.
Adding some styling to our Lightbox
Let’s make our application look a little bit better by adding some basic styling to it.
First, we will use flexbox to center our columns, and next we add a border and box-shadow to make the image pop more.
.container { display: flex; flex-wrap: wrap; background: url("https://images.unsplash.com/photo-1558051815-0f18e64e6280?ixlib=rb-1.2.1&ixid=eyJhcHBfaWQiOjEyMDd9&auto=format&fit=crop&w=1949&q=80") no-repeat center center; background-position: cover; min-height: 100vh; justify-content: center; align-items: center;}.container .col { width: 30%; margin: 1.6%;}.container .col img { cursor: pointer; border: 5px solid #fff; box-shadow: 0 0 1rem #aaaaaa; max-width: 100%; max-height: 100%;}As for our Lightbox goes, we need it to span over the whole page, and be fixed starting from the top.
.lightbox { position: fixed; z-index: 1; left: 0; top: 0; width: 100%; height: 100%; background-color: rgba(0, 0, 0, 0.5); overflow: auto; opacity: 1; visibility: visible; transition: all 0.3s ease;}We are using opacity and visibility so we can animate the fade-in and fade-out effect.
Now let’s add the hidden class.
.lightbox.hidden { opacity: 0; visibility: hidden;}And to top it up we style the button, content and image inside the Lightbox.
.lightbox .close { position: absolute; right: 2.5%; top: 2.5%; font-size: 2rem; cursor: pointer;}.lightbox-content { display: flex; margin: 5%; align-items: center; justify-content: center;}.lightbox-content img { max-width: 100%; max-height: 100%; border: 5px solid #fff;}JavaScript Lightbox effect
On to our JavaScript, this is the part that will hook everything up and make it work.
What we want to happen:
- User clicks on an image. We get the src of the image to append it to our Lightbox image and remove the hidden class from our Lightbox
- User clicks the close button. We re-add the hidden class to our Lightbox.
Let’s define the variables we need to make it work:
const lightbox = document.getElementById('lightbox');const lightboxHolder = document.getElementById('lightbox-image');We define our actual Lightbox element, and the image element inside it.
Now let’s create the function that will show the Lightbox.
openLightbox = (element) => { lightboxHolder.src = element.src; lightbox.classList.remove("hidden");};Wait, that’s it? Yes, we retrieve the src of the image the user clicked on and add it to our Lightbox. Then we remove the hidden class, and the user sees our Lightbox!
Now we just need the close function.
closeLightbox = () => lightbox.classList.add("hidden");And now we have a fully functional Lightbox, without using any plugins.
You can try this Lightbox out on the following Codepen below –
